Introduction
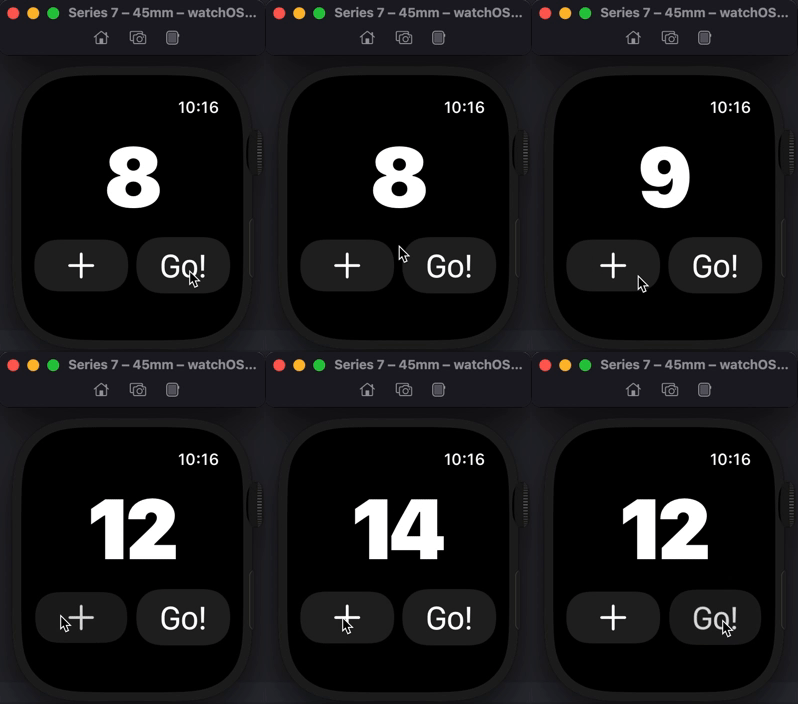
Today I wanna introduce you to Swift UI, and show you how to build a simple watchOS app using Swift UI. The final product will look like this:

What is Swift?
Swift is a multi purpose compiled programming language and it is still relatively new compared to Java or C#. However, this does not mean that Swift is not popular. It has first been introduced by Apple about 7 years ago and since then it has evolved into a huge open source project that is also being used widely outside the Apple ecosystem.
Swift is now the recommended language to build apps for Apple devices, an ecosystem that is generating $64 billion 🤯 in app sales every year.
Ok, what about Swift UI?
Swift UI is built on top of Swift, and allows us to create apps for any Apple platform while using as little code as possible.
The code you'll write in Swift UI is so much easier to understand because it uses a declarative approach to building user interface. In a nutshell, we instruct how our app should look like, and Swift UI figures out how to make that happen as the user is interacting with the app.
This declarative UI approach is, in my opinion, miles better than the imperative UI approach, which is how developers were building apps before iOS 13. Why? Because it provides superior state management features. If you'd like to read more about the difference between declarative and imperative UI, I strongly recommend Hacking With Swift's tutorial.
I feel like the best way to prove what I'm saying above is by showing you how easy it is to build a counter app for watchOS using Swift UI, so let's get going:
Prerequisites:
- Xcode v13.x
- Empty watchOS Swift UI project (instructions are available here)
- Basic OOP knowledge
After you've set everything up, go ahead and run the empty watchOS app and it should look like this, nothing too fancy (yet):

Adding UI Elements
The first thing we're going to do is add our UI elements and make them pretty. We will need a text box to display the counter, and two buttons to change the value in the text box.
We are going to wrap our UI elements in containers (if you know HTML, they're basically <div> tags) called VStack for vertical positioning and HStack for horizontal positioning. Pretty straight forward stuff so far.
VStack {
   //UI Elements will be vertically aligned
   HStack {
      //UI Elements will be horizontally aligned
   }
}
Adding UI elements is easy, we simply declare them inside our containers:
The Text block will be inside our VStack, and the two buttons inside HStack. This will allow us to position the two buttons side by side, and the text above the buttons.
We will also add a :label, which is a way to display a system icon or text inside the buttons.
A list of most common UI elements can be found in this awesome blog post.
VStack {
   //UI Elements will be vertically aligned
   Text("0")
   HStack {
       //UI Elements will be horizontally aligned
       Button{
          //button functionality code
      } :label {
          //button content code
      }
       Button{
          //button functionality code
      } :label {
         //button content code
      }
   }
}
Styling UI Elements
In order to change the styling of UI elements, we can stack modifiers at the end of the UI element declaration. Below you will see how we're going to add styling to our Text block.
We are also adding alignment properties to our containers VStack and HStack. We want our elements inside to be centered, and have a little space between them.
VStack(alignment: .center, spacing: 8) {
   //UI Elements will be vertically aligned
   Text("Hello, world")
            .font(.system(size: 90))
            .fontWeight(.black)
            .multilineTextAlignment(.center)
   HStack(alignment: .center, spacing: 8) {
       //UI Elements will be horizontally aligned
       Button{
          //button functionality code
      } :label {
          //button content code
      }
       Button{
          //button functionality code
      } :label {
         //button content code
      }
   }
}
Next up, we want to add some content in our buttons to tell our users what the buttons do. Inside our :label, we want to add a + system icon for the first button, and some text Go! inside the second button.
We're also going to make the icon and text a little bigger by adding a modifier to the UI Element like we did before.
VStack(alignment: .center, spacing: 8) {
   //UI Elements will be vertically aligned
   Text("Hello, world")
            .font(.system(size: 90))
            .fontWeight(.black)
            .multilineTextAlignment(.center)
   HStack(alignment: .center, spacing: 8) {
       //UI Elements will be horizontally aligned
       Button{
          //button functionality code
      } :label {
          Image(systemName: "plus")
                        .font(.system(size: 34))
      }
       Button{
          //button functionality code
      } :label {
         Text("Go!")
                        .font(.system(size: 34))
      }
   }
}
If you've followed so far, great job! We've just set-up all of our UI elements and also styled them. Let's see how it looks by running the app in a watch simulator:

Nice! But our buttons don't actually do anything. Let's make them do stuff.
Adding Functionality
So our plan is when we tap on +, our Text block counter will go up, and when we press Go!, the counter will go down.
This is a very simple example, and it will show you just why Swift UI is awesome.
What we need to do is declare a state variable that will hold the count number, and control what is getting displayed on the screen. As a rule of thumb, when data changes, UI changes. That is the golden rule of Swift UI.
@State private var count = 0
Now, the only things left to do is to increment and decrement when we press the buttons, and display the count value inside the Text block UI element by using string interpolation.
VStack(alignment: .center, spacing: 8){
            Text("\(count)")
                .font(.system(size: 90))
                .fontWeight(.black)
                .multilineTextAlignment(.center)
            HStack(alignment: .center, spacing: 8){
                Button{
                    count = count + 1
                } label: {
                    Image(systemName: "plus")
                        .font(.system(size: 34))
                }
                Button {
                    count = count - 1
                } label: {
                    Text("Go!")
                        .font(.system(size: 34))
                }
            }
        }
And we should be done! Go ahead and run the app in the simulator, and you should be able to play around with the buttons.

Closing Notes
While this was a pretty simple app to demo, I believe it really shows just how easy it is to setup UI elements and functionality in Swift UI.
If you are a web developer looking to get into native mobile application development, I think Swift UI is the way to go. If you know React, Swift UI will seem so simple to adapt to.
See you on the next blog post :)
